


Streaming Stock Data with Apache Flink and Cassandra


Introduction
Apache Flink is an open-source, unified stream-processing and batch-processing framework developed by the Apache Software Foundation. The core of Apache Flink is a distributed streaming data-flow engine written in Java and Scala. Flink executes arbitrary dataflow programs in a data-parallel and pipelined manner. This tutorial will show you step-by-step how to use Astra as a sink for results computed by Flink.
This code is intended as a fairly simple demonstration of how to enable an Apache Flink job to interact with DataStax Astra. We recommend using a Cassandra database for this demo. For the purposes of this tutorial we use Datastax Astra to preview those features.
Basic Activity Diagram
The diagram below shows pyFlink and AstraDB’s batch processing capabilities and how this integration unlocks a whole new realm of possibilities for data-intensive applications.


Prerequisites
- You should have Gradle, and Java installed in your system.
- Python v3.7 or later
- AlphaVantage API Key
Setting up Flink
1: Open a terminal and clone the GitHub Flink repository from using the command:
git clone git@github.com:Anant/flink-astra-stock-price.git2: Change directory into the `flink-astra-stock-price` folder and install the dependencies listed in the requirements.txt file.
cd flink-astra-stock-price3: Install the required packages for this plugin, run the following command.
pip install -r requirements.txt4: Open the AlphaVantage API. Select *Get Free API Key*.


5: Fill out the form to create your key and click *GET FREE API KEY*.


6: Receive the credentials through the email and add them to the “my_local_secrets.py” document.
Setting up your Astra DB
- Create an Astra Database. To match the demo as perfectly as possible, name the database “flink” and the keyspace, `example`.
- Add your keyspace name from your newly created database in the `my_local_secrets.py`.
- Select *Generate token*. Download the token to connect to your database.
- Add the `client_id`, `client_secret`, and `client_token to the corresponding fields on the `my_local_secrets.py` file.
- Click *Close*.
- Click *Get Bundle* to download a *Secure Connect Bundle* (SCB). Upload that bundle to your coding environment. Make sure to reference the location where you uploaded the document in the `my_local_secrets` file.

NOTE:
Never share your token or bundle with anyone. It is a bundle of several pieces of data about your database and can be used to access it.
- Move the SCB to app/src/main/resources in your GitHub directory (You do not have to unzip the file).
- Create a properties file titled app.properties, and place it in app/src/main/resources/.
- Add properties specifying your Astra client ID, Astra secret, and SCB file name. These should map to the “astra.clientid”, “astra.secret”, and “astra.scb” properties respectively. Your app.properties file should look something like this:
astra.clientid=Bwy...
astra.secret=E4dfE...
astra.scb=secure-connect-test.zip
Open the my_local_secrets.py file and fill in the following details.
client_id="<your-client_id>"
client_secret="<your-client_secret>"
token="<your-token>"
db_keyspace="<your-keyspace>"
secure_bundle_path="<path-to-bundle>/secure-connect-<YOUR_DB_NAME>.zip"
astra_id="<astra-id>"
astra_region="<astra-region>"
api_key="<your-alphavantage-api-key>"
Install Jupyterlab
Jupyterlab is a more advanced version of jupyter notebooks. It offers many features in addition to the traditional notebooks.
1: Install Jupyter with pip on your machine. Run the command below to do so.
a: If `pip` does not work, try `pip3 install juypterlab`.
pip install jupyterlab2: Type `jupyter-lab` in the terminal to open a window in your browser listing your working directory’s content. From the cloned directory, locate the notebook to follow the steps.

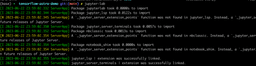
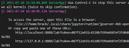
If it doesn’t start automatically, you can navigate to the JupyterLabs server by clicking the URLs in your terminal:

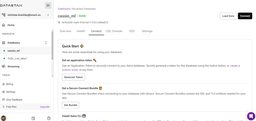
3: After running the `jupyter` command from your working directory, you can see the project tree in your browser and navigate to the files. Make sure you configure the secrets by following the next step before starting any coding.
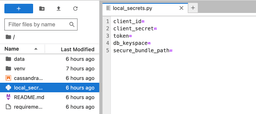
4: Open the `local_secrets.py` file and fill in the details provided/extracted from the Astra Portal after setting up the database details.

Running the Jupyter Notebook
Jupyterlab has more advanced functionalities than traditional notebooks. As with most Jupyter notebooks, you can run each block of the notebook. If you’ve correctly added all the fields to the my_local_secrets.py file, the notebook runs correctly.
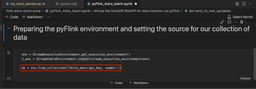
Configure your PyFlink datastream in the notebook so that the data that it pulls from your Astra API is correctly configured.
The stock symbol for which this demo is pulling the data is “IBM”. Change the third block [3] to pull the data for a different stock symbol.

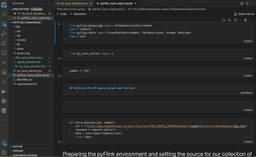

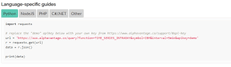
Our demo stack uses the Python API, but there are a variety of other languages the API that the developer community supports.
Defining API Queries
The AlphaVantage API can be used to pull different types of data. For this demo, we are using the popular Intraday (Time_Series_Intraday) API.
The query is currently set to pull the maximum number of free requests from the API. The intraday requests for each response includes for each 5 minute period:
- the value that it started at at the beginning of a 5 minute period,
- the maximum value in the 5 minute period,
- the lowest value in that 5 minute period,
- the closing volume at the end of the 5 minute period, and
- the volume of trades for that stock in the 5 minute period.


Next PyFlink structures the data that it gets from AlphaVantage into a data frame, filters out any data fields that have volume > 100000, and creates a data frame to use to upload the data to your Cassandra database – in our case Astra.
Writing to Astra
The notebook includes a schema creation block (block [13] of the `pyFlink_Astra_batch.ipynb` file) that can be run directly from the Notebook. You can also run the schema creation script in the CQL Console of your Astra Portal. Below is an example of the schema.
CREATE TABLE if not exists market_stock_data (
    date text,
    open float,
    high float,
    low float,
    close float,
    volume float,
    PRIMARY KEY (date)
)
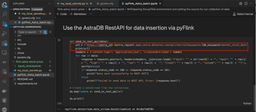
1: Use the AstraDB RestAPI in the `pyflink_Astra_batch.ipynb` file to insert the data into Astra.


The function, send_to_rest_api, is defined which takes a single argument named “data”.
def send_to_rest_api(data):2: Create a URL for the DataStax Astra REST API endpoint using formatted strings. The endpoint URL is associated with the specific keyspace and table specified in our `my_local_secrets.py` file in DataStax Astra.

Your function then iterates through each row in our data object and for each row, and a POST request is made to the previously constructed URL. The data payload for this POST request is a JSON string that appears to describe stock market data (date, open, high, low, close, and volume).
Datastream and Map
Create a DataStream and Map. After defining the `send_to_rest_api` function, the script interacts with a DataStream named ds.

It maps the `send_to_rest_api` function onto the DataStream using a `lambda` function. This implies that for each item in ds, the `send_to_rest_api` function is called which then sends data to the REST API.
ds.map(lambda x: send_to_rest_api(x))In the notebook, there is some error handling associated with the send_to_rest_api function.
Congrats! You should now have the AlphaVantage data in your Astra DB.
Test and Validate
After completing all prerequisites along with the section above, run the sample app and validate the connection between Flink and Astra.
1: In your `flink-astra` cloned GitHub directory, run `./gradlew run`
2: Verify that the application runs and exits normally. If successful, the following message appears:
BUILD SUCCESSFUL in 31s
3 actionable tasks: 2 executed, 1 up-to-date
3: Navigate back to the Astra UI to use the CQL Console. You can run this sample query to confirm that the defined data from the sample app has been loaded properly:
token@cqlsh:example> select * from wordcount ;
word | count
--------+-------
dogs | 1
lazier | 1
least | 1
foxes | 1
jumped | 1
at | 1
are | 1
just | 1
quick | 1
than | 1
fox | 1
our | 1
dog | 2
or | 1
over | 1
brown | 1
lazy | 1
the | 2
(18 rows)
token@cqlsh:example>
Conclusion
We were able to use pyFlink’s DataStream API and map functions to batch write data into AstraDB. The DataStream API is a set of tools for processing stream data, including individual record transformation and time windowing functionality. We have shown that we can make use of the Stream processing basics to do things like transform and filter out individual records depending on how we want the data to appear in Astra. This acts as a proof of concept for processing streaming data like IoT data coming from physical devices using a combination of Flink and Cassandra.
Getting help
You can reach out to us on the Planet Cassandra Discord Server to get specific support for this demo. You can also reach out to the Astra team through the chat on Astra’s website. Enhance your ELT for batch and stream processing with Flink. Happy coding!
Resources
https://www.alphavantage.co/
https://www.alphavantage.co/documentation/
https://nightlies.apache.org/flink/flink-docs-stable/
https://flink.apache.org/documentation/
https://pyflink.readthedocs.io/en/main/index.html
https://docs.datastax.com/en/astra/docs/ https://docs.datastax.com/en/astra-serverless/docs/manage/db/manage-create.html


